 SB
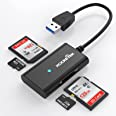
3.0 SD Card Reader, Rocketek 4 Slots Memory Card Reader with a 13CM
Flexible USB Cord for SDXC/SDHC/UHS-I SD Cards, Micro SD Cards, MMC
memory cards - Simultaneously Read 2 Different Memory Cards
SB
3.0 SD Card Reader, Rocketek 4 Slots Memory Card Reader with a 13CM
Flexible USB Cord for SDXC/SDHC/UHS-I SD Cards, Micro SD Cards, MMC
memory cards - Simultaneously Read 2 Different Memory Cards
Using the Raspberry Pi-4/Pi-5 as a cloning tool.
C. W. Andreasen – rev 6.07.24
One of the more difficult task with computers is the creation of a “clone” drive. Most wise computer users back up their data, but the backup must be on a different physical drive, or the backup can be lost along with the original, if the disk fails, …. and at some point it will fail.
The perfect answer is to have a clone of the original so that the failed drive is removed and the clone replaces it. Of course one should still do data backups because a clone is like taking a picture of the time the drives were cloned. Changes on the clone are not reflected beyond the time the clone was made. The main purpose of the clone is you get a fully working system with all of your programs, so if you replace the system/boot disk, the system will boot up and be current to the time the clone was made.
There are a number of ways a clone can be made but this article will discuss how to use the Raspberry Pi-4 or Pi-5 as a cloning tool. This is good assuming you have a Pi-4 or Pi-5.
The Pi-4/5 has a program called “piclone” but in the menu called “SD Card Copy”, and is found under the Accessories menu choice. This is the backup program provided with the Pi OS, Linux Debian (Buster, Bullseye and Bookworm). The expected use is to have the Pi running with the microSD in the provided slot and to do a clone to some other device. This is where it starts to get interesting because the Pi has no way to clone to another microSD (AKA TF) chip. The solution is simple, get an inexpensive USB3 adapter that allows you to plug in the chip/adapter into one of the USB3 ports. At this point you can run the SD Copy program. I will add at this point, earlier versions of the Pi have this same capability however without a USB3 port, a disk clone would take a longer time.
Now the fun begins because you do not have to clone to another microSD chip, you can clone to a USB stick, an external USB drive or whatever media you wish. In fact, on my system I use a USB to SATA adapter and use a SSD drive and I boot from it, and I don’t even use the normal TF chip. Getting back on track, when you get your USB to TF chip adapter, you can clone your system TF chip. I like this unit because it handles two chips at a time, and because the USB cord/plug will fit into a tight space on a crowded place.
SB
3.0 SD Card Reader, Rocketek 4 Slots Memory Card Reader with a 13CM
Flexible USB Cord for SDXC/SDHC/UHS-I SD Cards, Micro SD Cards, MMC
memory cards - Simultaneously Read 2 Different Memory Cards
This device allows you to clone SD devices without having to use the system’s microSD chip.

For cloning hard drives I highly recommend you got a powered USB3 Hub because the Pi-4’s USB ports cannot supply enough power to power two drives at the same time, but the Pi-5 has no problem, and thr process is the same. Get two inexpensive USB3 to SATA adapters and you can then clone between two SATA devices.
I recommend the VCZHS SATA to USB Adapter Cable - SATA to USB 3.0 Adapter Cable for USB 3.0 to 2.5 Inch SATA III Hard Drive Adapter Supports USB to SATA
Y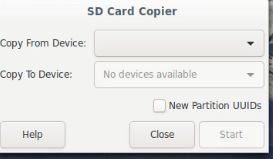 ou
can start your clone from the Pi-4 menu and you should get this
pop-up window. I recommend you check the “Copy From Device” and
make a mental note of the drive name. This is your system drive and
for our purpose we do not want to clone that drive. Again, just to be
safe, plug in just the source drive you want to clone, the then check
the list again and note the new disk ID that now shows there. Do the
same for the target drive. All of this is just so you know which
drive is which. Check “Copy To Device” and note you see the same
drives. Select the ‘From’ drive and the ‘To’ drive devices
and check the New Partition choice (unless you are overwriting an
older clone) and click on “Start” and in due time your target
disk will be a clone of the source disk.
ou
can start your clone from the Pi-4 menu and you should get this
pop-up window. I recommend you check the “Copy From Device” and
make a mental note of the drive name. This is your system drive and
for our purpose we do not want to clone that drive. Again, just to be
safe, plug in just the source drive you want to clone, the then check
the list again and note the new disk ID that now shows there. Do the
same for the target drive. All of this is just so you know which
drive is which. Check “Copy To Device” and note you see the same
drives. Select the ‘From’ drive and the ‘To’ drive devices
and check the New Partition choice (unless you are overwriting an
older clone) and click on “Start” and in due time your target
disk will be a clone of the source disk.
One great thing about this clone is it is not fussy about disk size. If your source disk contains data that only uses a small amount of space, you can clone to a smaller drive, as long as the target drive has enough space to hold all of the data that is on the source drive. I have cloned a 500 GB drive to a 250 GB drive with no problem, However there seems to be a limit as I was unable to clone a 1 TB drive to a 500 GB drive, even though the actual used space was less than 200 GB.
Another approach
which is attractive 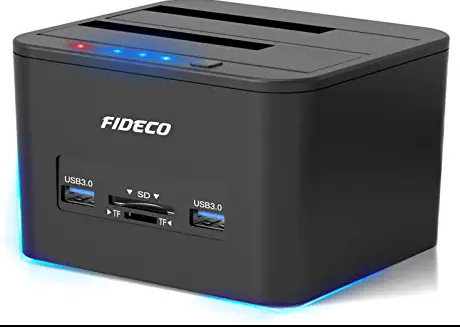 is
to use the FIDCO docking station. Advantages are: About the same
over-all cost, has two built-in USB3 ports, has its own power supply,
as well as a microSD and a full-size SD port. It takes place of all
of the otherwise needed adapters, and will, off-line, clone between
any combination of SSD and/or HDD drives. It does not need the Pi for
this function, but when working with the Pi it acts as a universal
adapter that allows all of the normal Pi functions. I actually keep
my system SSD in the first slot and boot and run from it. I have no
microSD chip installed in the Pi-4/Pi-4. The Pi-’s can be
configured to boot from the USB3 (terminal ‘sudo raspi-config’,
advanced options, boot order)
is
to use the FIDCO docking station. Advantages are: About the same
over-all cost, has two built-in USB3 ports, has its own power supply,
as well as a microSD and a full-size SD port. It takes place of all
of the otherwise needed adapters, and will, off-line, clone between
any combination of SSD and/or HDD drives. It does not need the Pi for
this function, but when working with the Pi it acts as a universal
adapter that allows all of the normal Pi functions. I actually keep
my system SSD in the first slot and boot and run from it. I have no
microSD chip installed in the Pi-4/Pi-4. The Pi-’s can be
configured to boot from the USB3 (terminal ‘sudo raspi-config’,
advanced options, boot order)
All of the equipment I have mentioned is available from Amazon.com.
*Added Note:
I have found that the Raspberry Pi-4 will not clone a UEFI disk. Since all new systems coming out are UEFI boot, this given technique won’t work, but it does work very well with ‘Legacy’ boot disk. This applies only to using the Raspberry Pi.