Figure
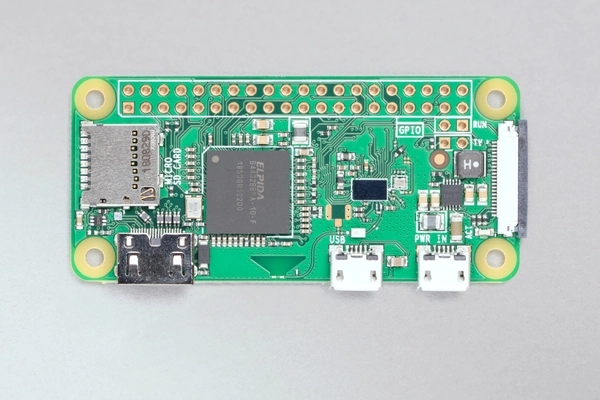
0: Raspberry Pi-Zero
Raspberry P1-Zero
C. W. Andreasen, rev 8.19.24
T
Figure
0: Raspberry Pi-Zero
One can also, if desired, purchase various ‘Hats’ for different capabilities.
The Pi-Zero processor is a quad core processor (The older version has 1 core) with a one GHz clocking speed. There is one video connection (mini-HDMI), one USB connection (micro USB and a power connection, and of course the slot for the microSD chip. It has only 440 MB of usable RAM (remember the original PC had only 680K of memory, later expanded to 1 MB). The Pi-Zero is way more powerful than computers of the age when the PC was introduced by IBM. In fact the Zero will do almost anything a desktop Linux computer can do, limited only by System RAM available and the speed that in some cases would be slow.
There are two ways to set up the operating system, The first is the normal recommended Pi OS which does not include all of the applications like LibreOffice, but has the normal GUI desktop.
The second way is to load the version that has no desktop, just the command console, better known as Terminal or Command Prompt. Both are fine depending on what you are doing.
The desktop version uses up a lot of system memory and when installed it leaves only about 25% of the system memory for applications use.
The Console mode leaves about 75% of the system memory for applications.
The problem is most of us are comfortable with the desktop and not really up to living with the command prompt level.
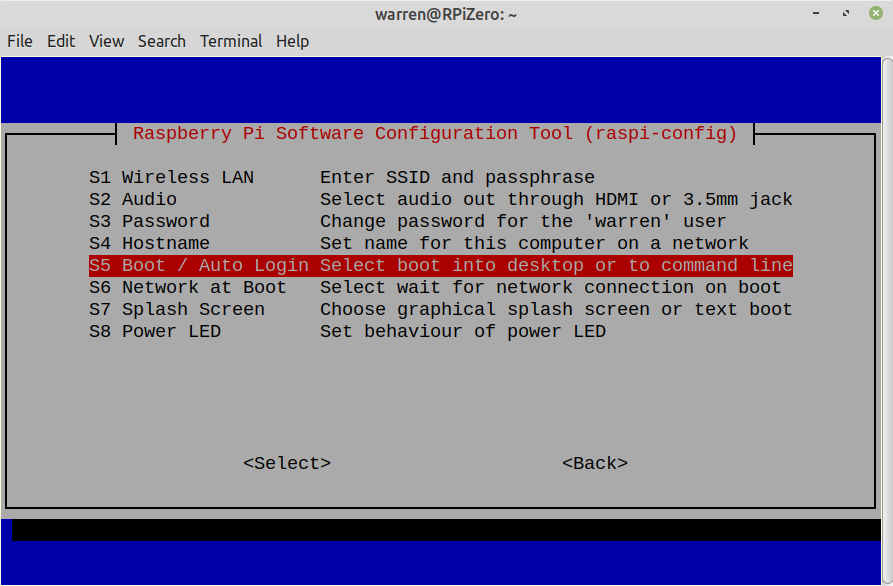
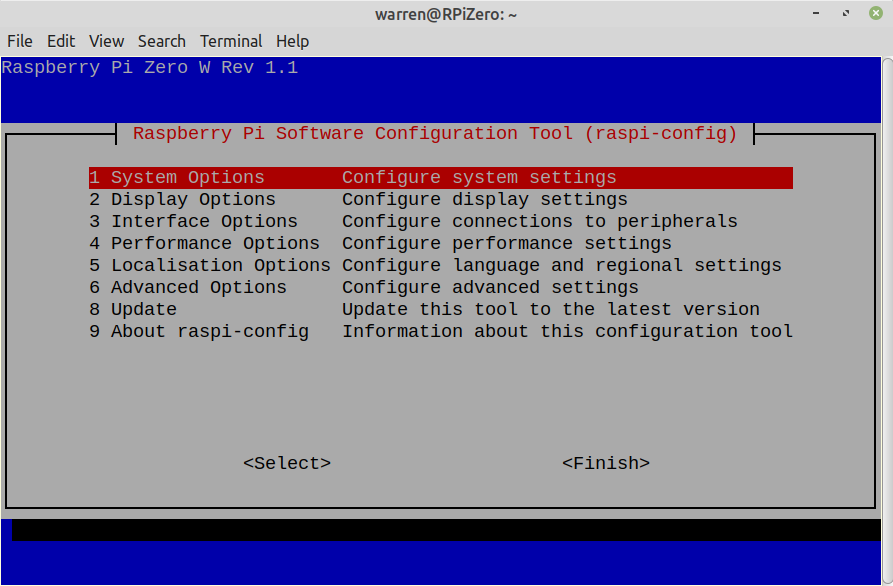
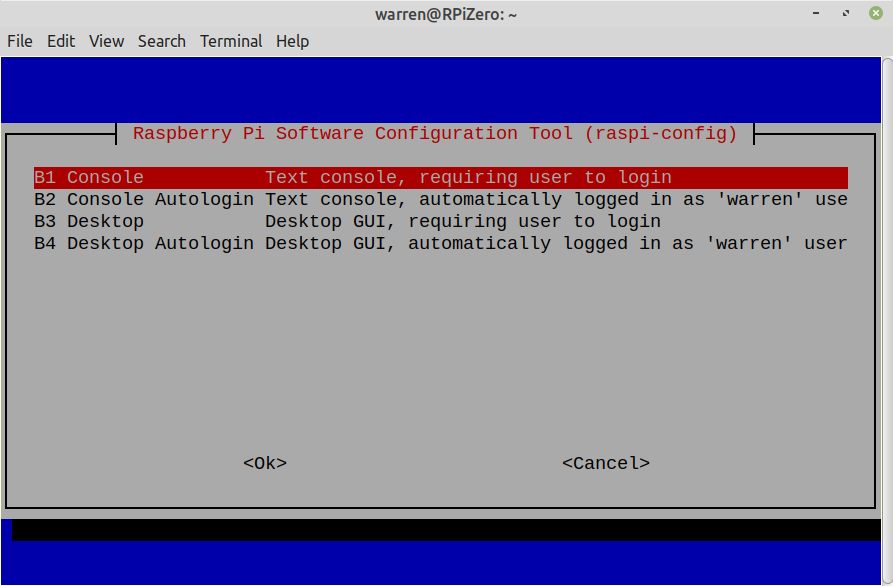
I have found a solution. Install the desktop version and use it as needed, but the desktop (GUI) can be turned off and will free up the memory. To do this you use the program [sudo] raspi-config and one of the menu items allows you to boot up in desktop or console mode. One can go back and forth, but each time it is changed the system needs to reboot. There is an exception, as follows: If you have a direct connection (mouse/keyboard/monitor) you can boot up into the console, then enter the command <startx> and it will bring up the desktop. To return to the console, log off, but select the return to console, and the desktop will go away, no need to reboot
r
Figure 2: 2nd Screen
Figure
1: First Screen
Figure
3: 3rd Screen
Installation and Set-Up
For initial setup you need a monitor and a keyboard. Be ready to connect to the Internet via the Wi-Fi network after you plug in the microSD chip that contains the install software, and the installation starts. At the appropriate time it ask for network name and passphrase.
Turn on power and answer questions when asked.
One note here, you can install the operating system without using WiFi but in that case there would be no WiFi connection so that would preclude using a remote desktop, and getting updates.
Once installed, for the desktop you want a mouse. Since there is only one USB port an external USB Hub is needed to allow both USB mouse and keyboard to work. Use a 4 port hub so you can use a keyboard, mouse, and a USB to micro SD adapter so backups can be done. If a powered hub is used then you can also handle other devices like memory sticks (Thumb Drives).
About the Raspberry Pi-Zero
The Pi-Zero is the perfect computer for running a dedicated task that runs a program at the system level. It has all the power of the Linux Debian operating system and without the Graphic User Interface that eats up almost all available memory, and makes it run slower, it is a very capable computer.
I have identified a couple of uses for this tiny computer and one of the most interesting is to use it for your very own, private and secure Dropbox, or Cloud Server. You can place it anywhere it can get power and be in range of your Wi-Fi network. Depending on what size of microSD you use you have available a mass-storage device. In fact the computer can be doing other dedicated task at the same time. If you should care to pay for it, you can stick in a TB microSD chip. The computer itself uses such a small amount of space that almost all space is available for file storage. In the 1TB case the memory would cost several times the cost of the computer itself… it would be the most expensive part of the system. I am using a ‘cheap’ 35 GB memory chip and the system is using less than 2 GB.
Another use is as a web page server. For testing I uploaded my http://qso/k7cwa web page to it, after installing Apache2, and my page at 1.6 GB of data. When accessing the page via my network, it looks just as good, and is as fast as my page on the Internet does… I can’t tell any difference.
Since I have the GUI installed, but turned off, all work is done at the terminal level, so I disconnected the keyboard and monitor and now access it using ssh from my ‘big’ Linux computer. I have to keep reminding myself I am not on a ‘big’ computer, but on a 2 1/2 inch by 1 1/8 inch board, mounted in a small case that has only one cable (power) connected to it. I can place it anywhere in the house and forget about where I put it.
Working at the terminal level requires one to learn some new ways of doing things. They are just a different way to do things you have always done at the desktop level.
One important command is ‘sudo adduser’ which will add a new user and you will be prompted for full name, various information you don’t need to fill in, and of course a password. The password can be easily changed later with the command ’passwd’ where you are prompted for the existing password, then the new one (twice). I recommend you add yourself as a user with sudo. pi and sudo group privileges and change the Pi password away from the default “raspberry”.
This new user must be given privileges before he can do anything, you use the format:
‘sudo adduser [username] [group]; so ‘sudo adduser john dialout’ would add user john to the dialout group which is needed if john wants to do email. Everybody should belong to the dialout group.
If you are going to install Apache web server ‘sudo apt install apache2’. The install will automatically add www-data to the group list. All files in the HTML section (that was added by the apache2 install) must belong to the www-data group, otherwise people connecting from the Wi-Fi won’t have permission to view the files. Actually I think the newer operating system installations already have the www-data group created, but no matter.
There are many commands, like ‘sudo reboot’ that are very useful. I suggest you search the Internet for commands you need. One such place to look is; https://raspberrytips.com/raspberry-pi-commands/ which shows how to use 57 different common commands.
Another very useful command is go to the top of your web area and make yourself the owner and the files group of www-data. Say you go to ’cd /var/www/html’ and you do this command:
‘sudo chown -R [logon name]:www-data *’ (no brackets or quote marks, but fill in the desired owner name logon name). This well set ownership of all files and directories and sub-directory/files as owner specified and all belong to the www-data group that allows any browser user come in from the network and view the files. Web users are automatically a member of the www-data group. Just for understanding, that command line breaks down as follows: chown is Change Owner. -R (must be uppercase as shown) says to do all sub-directories also, Then we have owner:group which sets both, and finally the ‘ * ‘ means any file or folder (everything). If you use a file name there it will change only that file, and you can use other wildcard combinations like *.html for only html files. It is best to use a folder name instead of a wildcard as shown as it is easy to accidentally change files that you don’t want to change. Select a folder and the -R will get that folder and everything contained, including sub-folders and contents. I should point out that when apache2 was installed it most likely has all of the web section owned and in the pi group. You should back up to the www folder and do the chown -R for the html folder, else wise you will find it difficult to put your web files in because if you are not logged on as pi, you do not have permission to do anything. Sudo chown -R [name]:www-data html
Follows is a list of some of the pro’s and con’s to using a Pi-Zero.
Pro List some of the good points
Very inexpensive. Full price with case, power supply, and everything else needed, including state tax, on Amazon, is less than $39 (at the time of this writing). The computer in the normal version, bare computer, can be had for less than $9 (-2W version) and the version 1 without Wi-Fi or Bluetooth can be had for $5.00. I recommend the newer model version with a full kit of accessories.
Built-in back-up software (clone)
Built-in wireless adapter and Bluetooth adapter. No worry about a LAN connection.
When working in the shell without the GUI the system is quite fast. Programs like NANO (text editor) work full speed at the shell level. There is also a built-in compiler which will compile source code.
Software detects and connects network printers (with the GUI installed anyhow)
Tiny and low power and small size, roughly one inch wide and two and a half inches long.
Free operating system downloaded from Raspberry Pi’s web site.
Cables and adapters provided with the kit.
One mini HDMI output for a monitor, but an adapter is provided with the kit so a standard HDMI cable can be used for the monitor.
Source code compiles quite nicely on the Zero using the ‘./configure, and ‘make’ commands. and/or the cmake compiler.
Apache2 web server installs nicely and when using the web section, the results are indistinguishable from a main-line system on the Internet.
Once set up the computer runs fine with no keyboard, no monitor, no mouse with just the power connection and the Wi-Fi wireless connection.
Con List
No Ethernet connection so one must use WiFi (unless you buy a special Ethernet Hat).
The built-in Wi-Fi is low band only, does not detect the faster high band.
It is difficult to use applications launched from the desktop because the GUI eats up most of the system memory. Internet browsing is not really an option, it is slow and this makes it impossible to download programs via the program manager or browser.
The GUI has limited usefulness because of system memory issues.
The low clock rate (relatively) and read/write speed of the MicroSD chip make for long transfer times when uploading or downloading large files. Uploading time is at about 2.5 minutes per Gigabyte. Download time is about the same. Normal single file transfers seem almost instantaneous.
If a USB memory stick is used, the system may not see it and it is not mounted. This is because the USB port is not capable handling the power. With an external powered hub it does work.
The USB port is not USB3 but is the older USB2.
Another thing of note. When the system uses an external powered hub, it not only solves the port loading problem, but it also powers the Pi back through the USB connection. A separate power cube for the Pi is no longer needed.
One last thing; to use the network to connect to the Pi you must know the IP address. One way you can find out what it is, is from the command prompt. Enter the command hostname -I (upper case I “aye”) and it will return your unit’s IP address in the form of ‘192.168.1.39’.
Groups
One thing hard to find, is what are the names of available Groups to which a user can belong. Keep in mind, new groups can be created, and many that exist now are not needed for anything, but here is a more-or-less complete list from my Pi-Zero:
root, daemon, bin, sys, adm, tty, disk, lp, mail, news, uucp, man, proxy, kmem, dialout
fax, voice, cdrom, floppy, tape, sudo, audio, pulse, dip, www-data, backup, operator
list, irc, src, gnats, shadow, utmp, video, sasl, plugdev, staff, games, users, nogroup
systemd-journal, systemd-timesync, systemd-network, systemd-resolve, input, kvm
render, crontab, netdev, messagebus, ssh, bluetooth, avahi, i2c, go, lightdm, rdma
rtkit, lpadmin, ssl-cert, pulse, pulse-access, scanner, saned, colord, systemd-coredump
If you want to see what groups you have and who belongs to each group, go into terminal and type the following command <cat /etc/group | less> (no brackets – space between cat and /etc). There is much more than can fit on one screen but it will stop when full, and each time you hit the space-bar it will advance one screen. You can also use the arrow keys to move forward and back a line at a time. When done just type the letter Q to quit.
dialout:x:121:warren,k7cwa
Is what one entry looks like on my Pi. This one shows group dialout has two members, warren and k7cwa. The ‘x’ is a placeholder that points to a special encrypted password “shadow” file (/etc/shadow) that contains encrypted passwords, and the number is the item ID seems to be assigned more or less sequentially and I think the system uses the number rather than the text, the text being for humans use. Root is always 0 (zero), pi is 1000, and pi is a member of the root group. I assigned myself to the pi group and found my group was assigned the number of 1001. It is not important to know this so don’t let it bother you if you are confused.
More about Groups
A group is just a name, it does not ‘do’ anything. It does add an extra layer of security. A program or application is assigned to a group, you must also belong to that group to use it. Every user can belong to any and all groups, and in fact each user automatically becomes a group. Root is set up as a member of all groups so if you belong to the sudo group you have pretty much everything. If you do not belong to the needed group, then you would need to use sudo and enter your password to access the file or application.
Normally a person is not assigned the group of ‘root’ but instead is assigned to the ‘sudo’ group. The sudo group members can enter the command sudo and get temporary root access. A common user who should not even be in the terminal level might not belong to the sudo group so this person cannot do anything to damage the system. Such a person would be limited to just his or her own account and would not be able to open any files they do not own.
Every file has properties and under Permissions the file is assigned to an owner and a group. If you are not the owner, and do not belong to the same group as the file, you cannot open the file. It takes root privileges to change ownership and/or group. If you create a file it will automatically be assigned to you and your group so unless changed, It is your file and you have full privileges in dealing with that file, and nobody else can touch it (without root powers).
There
are several groups to which we do need to pay atten
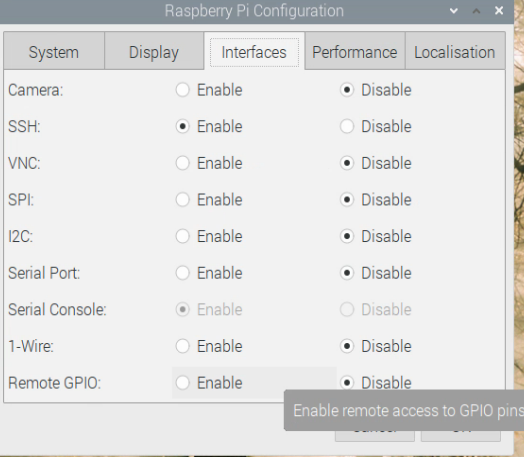
Figure
4: GUI Pi Configuration Menu
One note, to use ssh it must be enabled but it allows you to connect from a different computer. The format is “ssh [name]@[ip address]” so as an example I use “ssh warren@192.168.0.5” to connect to my Pi-zero. The first time it will note your ‘fingerprint’ is not on file and it asks if you want to save your fingerprint. Type “yes” and you will not be asked again. Do note this connection is Console/Terminal only, no desktop is possible.
Since most of us working on the system are the owners, normally we just give ourselves all groups and forget about it. It does not hurt to have groups that are never used but it is not so good to need a group and not be a member of it. It is better to have it and not need it than to need it and not have it.
All experts say you should never log on as a root, (actually root is not a user so you cannot log on as root) but you should create your own account. Note that while pi is a root user, pi is not the root, which is oddly enough called root and is not a logon account.
This “groups” information is not just for the Pi-Zero, it is for all versions of Linux and it is good to understand.
For the sake of security, change the default password for ‘pi” from the standard “raspberry” to a secure password. Use adduser to create your own login name and password and use it. Make yourself a member of sudo, and pi and if you have loaded apache2, www-data, and throw in adm, dialout and ssh, and you should be pretty well set to do anything
Of course you can just log on as pi, but where is the fun in that?
As to the speed issue, I ran a test using six different computers to compile a large source file. The process is a very intensive load on the processor. It is unimportant but for those that wonder, the program I compiled is the program “Hamlib”.
My best computer is a Dell with a 10th generation processor and six cores. It compiled the program in 44 seconds.
My second computer has 2nd generation processors and a total of 8 cores. The program compiled in 1 minute and 30 seconds.
Next was a Raspberry Pi 4B which has 4 cores, running the Buster OS. It took 3 minutes and 42 seconds. With the newer Bullseye OS it took 4 minutes and 45 seconds.
Next was a Raspberry Pi 3B+ which has 4 cores and took 7 minutes and 42 seconds.
Next is the Pi-Zero-2 which has 4 cores. It took 12 minutes and 2 seconds.
Lastly we have the single core Raspberry Pi-Zero. It took 54 minutes! But it did do it.
Do not lose sight of the fact this was a very intense test of the processor under full load. When running in the control console mode doing normal things, little slowness is noted. When using the desktop, yes it is slower than we would like, and there is not enough free RAM to do much anyhow.
I have not tried any of the alternative operating systems or desktops (GUI) but once you get it all running, in the console mode enter the command [sudo] tasksel and wait a short while then you will get a list of various things you can install. I think almost everything is an alternate desktop, I know Cinnamon is because I have the Cinnamon desktop on my Pi-4B and I like it very much. (late note: Cinnamon desktop will install on Buster but does not run on the new Bullseye software.)
The Raspberry Pi Zero has it’s limitations but where else can you get a computer and endless hours of playing and learning, for under $40 (full kit)? The new Pi-Zero-2 (W) is only $15 for the computer itself. It is a quad core computer and is 4-5 times faster then the single core verson.
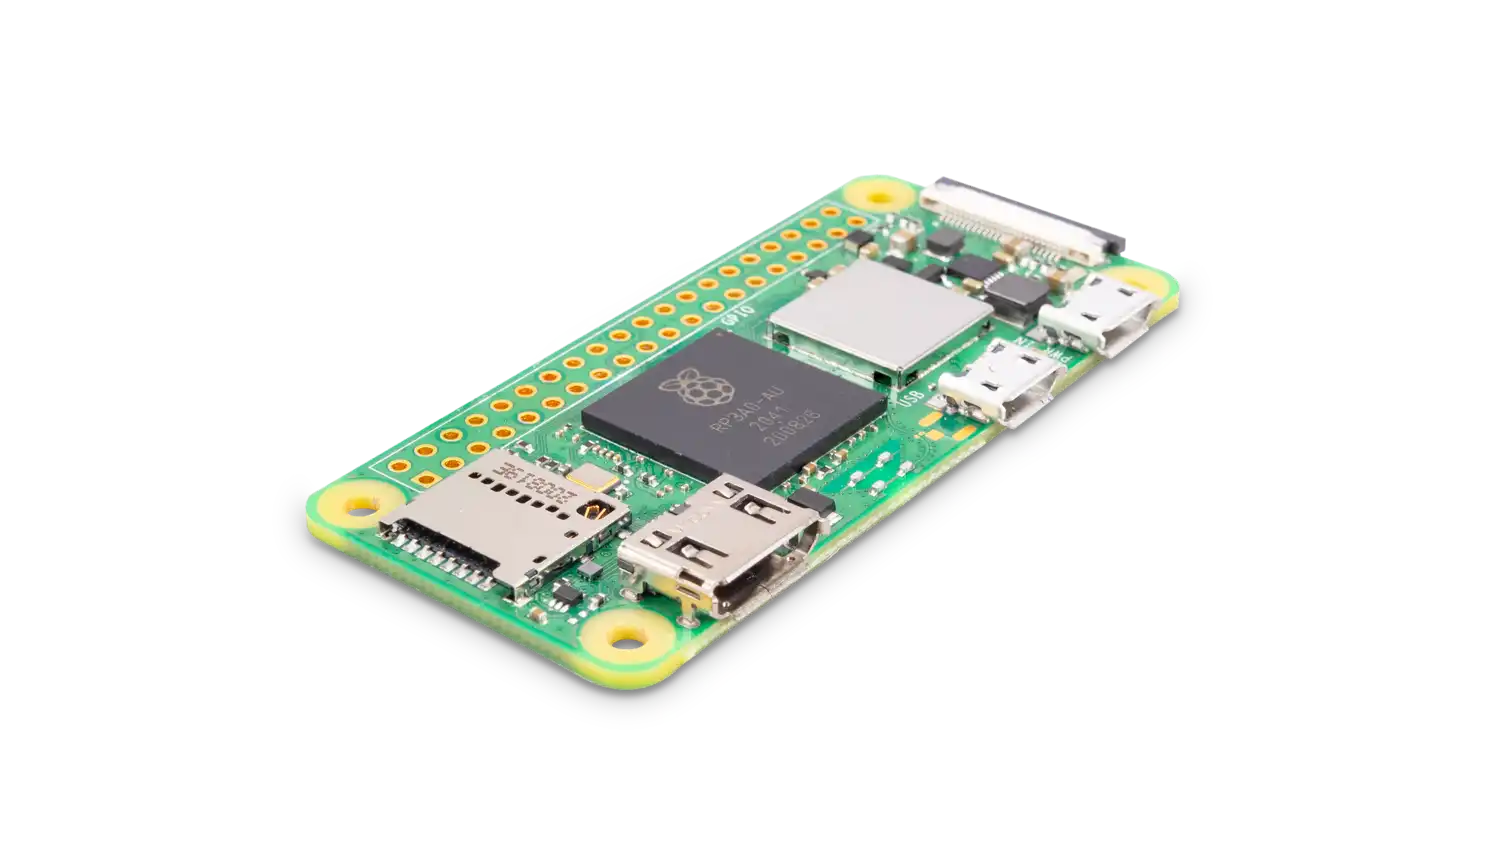
Raspberry
Pi-2
The Raspberry Pi Zero-W2 is shown above. It looks almost identical to Pi Zero-W. There are two differences. The network/Bluetooth assemble now has a metal cover to reduce spurious emissions, I think, but there is no observable difference in the operation. The other difference being a different processor, a quad core. When doing things that are processor-intensive, it is four times faster. I put it to the test and in fact found it is in reality four times faster, maybe even slightly more. For most task the difference is not really noticeable.
I have found a big difference between the two models, some programs that run on the 2 will not run on the old model. One example is Java. It works on the -2 but if I try to run it on the original Pi-Zero I get an error message saying that it cannot run on that processor.
The -2 version really obsoletes the -1 version.
Page