The following information is based on the various Debian lines of Linux and in particular the Raspberry Pi working at the console level (because the desktop Graphic Users Interface (GUI) takes up too much memory and makes the speed extremely slow). That being said, it is relevant to most, if not all Linux release versions. This was written primarily for the Raspberry Pi Operating System (Pi OS) and the new user in mind.
Rev 8.12.24
Linux Security
When a MS-Windows user first tries to use Linux, there is a strong urge to try to make Linux work like Windows. This is a mistake because it negates the very foundation of Linux.
I know from my own experience that there is the feeling that ‘this is MY computer and I don’t want it to control me!’ and we try to force Linux to behave like Windows. The desire is to override, or get rid of the security. It is far better to understand the foundation of Linux and use it properly. One good reason to keep permissions controlled is it keeps the user from accidentally doing something that messes up the operating system. It also protect us from unwanted intrusions into our computer.
One real-world example: When accessing my credit card accounts, I noticed when I logged off a blast of error flashed on my screen. I captured them to analyze the cause. I found the browser was trying to access my personal profile but were being blocked by lack of permission. This happened with three separate banks. A Windows user would be a victim and never know it.
To understand the security system one needs to know every file and directory has three types of access. One can read, write, and execute a file. There three ‘user types’, owner, group, and others.
The owner owns the file, the group has access rights, and others may or may not be allowed to do anything. [owner | group | others]
Every file has permissions. In technical terms it is nine bits and each binary bit represents a function and are set using Octal numbers.
On your Linux computer, from the terminal/console, enter the command ls -alF and you will see the permissions of each listed file. Example:
-rw-rw-r-- 1 warren root 3771 Jun 26 2018 log.txt
In this example the file is owned by warren and the file belongs to the root group and the -rw-rw-r-- tells me the kind of file and the permissions assigned. If the file is a directory, the first character would be a “d”. The file type character is managed by the operating system only. There are other flags, like “l” for a Link file, but the file type is maintained by the operating system and you can ignore it; the user cannot change it.
In this example the owner can read and write, the group members can read and write, and ‘other’ users can read the file but cannot change it.
The rest of the ‘bits’ are divided into three groups representing owner/group/other, access. The positions are each controlled by each respective bit; “Read, Write, Execute (rwx). Each of the three sets (Binary), are set using an Octal number:
Oct=Bin -- Permission
0 = 000 – no access
1 = 001 – executable
2 = 010 – write
3 = 011 – execute and write
4 = 100 – read
5 = 101 – read and execute
6 = 110 – read and write
7 = 111 – read, write, and execute
The earlier example (-rw-rw-r--) is 664 (110 110 100).
This is repeated for each set of three bits. If all bits are set (777) it would produce “-rwxrwxrwx “.
If I set (sudo chmod) to 600 for example, only the owner can access the file. “-rw-------”
A common setting would be 744 which gives the owner total control and all others the ability to read the file but not make changes.
If all files are set to 777 there is no file security at all, anyone has unrestricted control and access.
Now
about “Owner” and “Group”
Unless it gets reassigned, a file is automatically owned by it’s creator and is in the creator’s group, and have the default permissions of rw-r--r--. A file created by warren can be read by anyone but only changed by the owner, in this case, by warren.
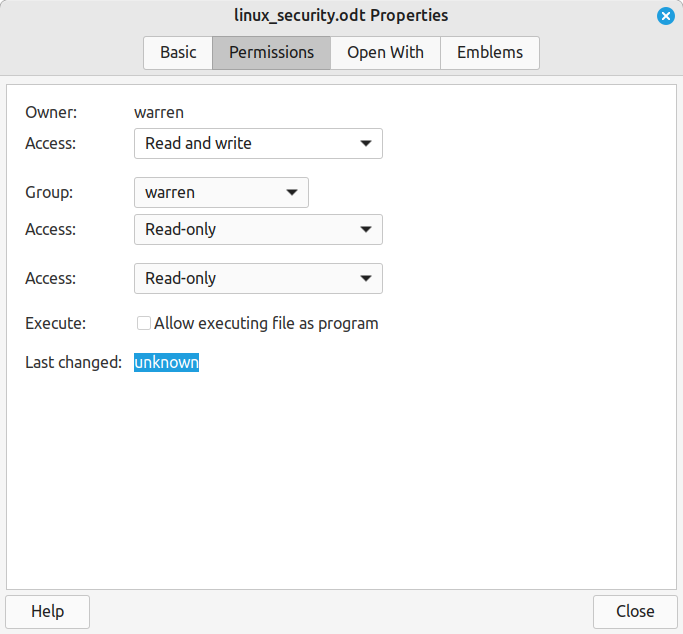
A user can belong to any number of groups. A file can belong to only one group. While chmod is used from the console/Terminal level, it is maybe easier, if the GUI is installed, to use the file manager and right-click on the file and select properties, then make changes (you must be root to make changes):
The owner is the person’s user name (logged on as). 644 would be good for a document file; the owner could read and write and anyone else can read it only. Owner and group work together to determine who can access the file while permissions limit what the person can do.
A group can have any name but the group must exist to be used. One can see what groups exist using the command cat /etc/group | less and the group names will be displayed, as well as to who belongs to each group. If you want to see what groups a specific user has, use the command;
cat /etc/group | grep [user] (no brackets) and it will only list the groups to which that specified user belongs. It is interesting that root does not belong to any group and the user ‘pi’ on a Raspbery Pi belongs to all groups except user name groups or newly added groups. As a point of reference, groups are rarely added or removed.
A new group can be created with the command sudo addgroup [groupname] (no brackets) and sudo delgroup [groupname] (no brackets)will remove a group name.
One group that you want to belong to is the sudo group as it allows you to access root powers when needed. Of course if you are running a Raspberry Pi and logging on as Pi groups are not an issue.
(no brackets)
To create a new user on a Pi, use the command sudo adduser [name] and answer the questions.
To add a user to a group it is sudo adduser [user] [group] ; sudo adduser warren dialout would add warren to the dialout group. If email is going to be used, the group ‘dialout’ is important.
When you import files from somewhere else, it is important to look at ownership and permissions. To change ownership use the command sudo chown [owner]:[group] [filename]. If you don’t specify the group it will leave that field alone and not change it.
<sudo chown warren:www-data filename> would make [filename] owned by warren and belonging to the www-data group, as in a web page.
About Users
The structure of Linux is much like an organization chart. At the top is root. Root is not a user as such, but it is the ‘top’ of the organizational chart. Under root there is a divide and on one side is system stuff and on the other is a folder called “home”. In the home directory [aka folder] we find the name of each user. Each user has a private branch of the tree and when logging on, is passed to the account’s private home directory. Unless the user is knowledgeable the user knows of no other users and cannot even get into other accounts or files. To each user it is as if they are the only user and each user has access only to their own branch (home folder) and files. Each user creates files and directories but unless permissions are changed, are only accessible to the owner/user. Other users don’t even know they exist, they are on a different branch. Linux is a true multi-user system. Several users could be working at the same time and not be aware of each other. By the same token, a user can open multiple terminals (console mode) and even log on again as a different user, and move back and forth between accounts. Each user/job has a private shell and do not interact with other shells. One caveat though, while you can run many shells, only one instance of the GUI desktop can be running.
As an aside, one little gotcha is if you are running in a normal window (GUI) and you do a <Ctrl+Alt+F1> (or F2, or…...F7) it will open up a new console logon shell. If you don’t know the trick, you can’t get back to your desktop. The trick is to switch to <Ctrl+Alt+F7> which is where the Graphic Users Interface (GUI – AKA Desktop) lives. The normal configuration is one user with a keyboard, mouse, and monitor… and only one person on at a time, but via a local area network (LAN) any number of people can be working at the console level, at the same time, using the ssh connection. The same user can be logged on multiple times, each in a different shell as well.
The console mode just described is not exactly the same as the Terminal available from the GUI <Ctrl+Alt+T> which can exit with a simple “exit” command. The Terminal is active with your account and user, while the console <Ctrl+Alt+F#> ( = Function key, # = a number, 0-7) requires a new logon and can be any user. Multiple users can be logged on, or the same user, each in a different shell.
Keep in mind that this is true for all Linux versions, including the tiny Raspberry Pi Zero.
About Linux Versions
There are many versions of Linux but the differences are mostly the desktop (GUI) and how it is used. Strip away the desktop GUI and work at the terminal/console level (using the default bash shell) and there is little difference between versions. My desktop computer is running LMDE, my Raspberry Pi’s (six) are a mix of Pi5, Pi4, Pi3 and Pi-zero., all running the Pi OS. I used to run Linus Mint, and before that Ubuntu, and at the console level there is little difference. Also, working at the console level, a mouse is not needed. One thing about Ubuntu though, it’s default shell is ‘sh’ or ‘dash’ and they are slightly different than bash. Just enter the word “bash” to switch to the bash shell.
One side note; there are quite a few different shells including bash, dash, sh, and a number of others. Bash is more or less the standard, and dash and sh are subsets of bash and are more limited, but others can be used. To select a different shell type, at the prompt just enter the shell name. To set your default shell, in the /etc folder there is a file called “passwd” and it contains your logon information. Sample: warren:x:1000:1000:warren,,,:/home/warren:/bin/bash
Notice the last item on the line is my default shell name. One can edit this and simply change it to the desired shell name.
You must be a root or su to modify the passwd file.
Ubuntu is the only Linux OS I have used that does not use ‘bash’ as the default shell.